
Pizza API and MCP server for building AI Agents




⭐ If you like this sample, star it on GitHub — it helps a lot!
Overview • Getting started • Local development • Deploy to Azure • Resources • Troubleshooting
This project demonstrates how to build AI agents that can interact with real-world APIs using the Model Context Protocol (MCP). It features a complete pizza ordering system with a serverless API, web interfaces, and an MCP server that enables AI agents to browse menus, place orders, and track order status.
The system consists of multiple interconnected services:
- Pizza API: Serverless API for pizza ordering
- Pizza MCP server: MCP server enabling AI agent interactions
- Pizza web app: Live order dashboard, showing real-time pizza orders status
- Registration system: User registration for accessing the pizza ordering system
[!TIP]You can test this application locally without deployment needed or any cloud costs. The MCP server works with popular AI tools like GitHub Copilot, Claude, and other MCP-compatible clients.
Overview
This sample uses a microservices architecture deployed on Azure:
Core components
- Pizza API (Azure Functions): RESTful API handling pizza menu, orders, and business logic
- Pizza MCP server (Azure Container Apps): Exposes the pizza API through MCP, enabling AI agents to interact with the pizza ordering system
- Pizza web app (Azure Static Web Apps): Real-time dashboard for monitoring orders and system status
- Registration API (Azure Functions): User registration for accessing the pizza ordering system
- Registration web app (Azure Static Web Apps): Web interface for user registration
- Pizza data: Scripts used to generate the pizza and topping data and images used in the API.
MCP Tools Available
The Pizza MCP server provides these tools for AI agents:
| Tool | Description |
|---|---|
get_pizzas |
Retrieve all pizzas from the menu |
get_pizza_by_id |
Get specific pizza details by ID |
get_toppings |
List available toppings (filterable by category) |
get_topping_by_id |
Get specific topping details |
get_topping_categories |
List all topping categories |
get_orders |
Retrieve orders (filterable by user, status, time) |
get_order_by_id |
Get specific order details |
place_order |
Create a new pizza order (needs userId, optional nickname) |
delete_order_by_id |
Cancel pending orders (needs userId) |
Getting started
There are multiple ways to get started with this project. The quickest way is to use GitHub Codespaces that provides a preconfigured environment for you. Alternatively, you can set up your local environment following the instructions below.
Use GitHub Codespaces
You can run this project directly in your browser by using GitHub Codespaces, which will open a web-based VS Code:

Use a VSCode dev container
A similar option to Codespaces is VS Code Dev Containers, that will open the project in your local VS Code instance using the Dev Containers extension.
You will also need to have Docker installed on your machine to run the container.

Use your local environment
You need to install following tools to work on your local machine:
- Node.js LTS
- Azure Developer CLI
- Git
- PowerShell 7+ (for Windows users only)
- Important: Ensure you can run
pwsh.exefrom a PowerShell command. If this fails, you likely need to upgrade PowerShell. - Instead of Powershell, you can also use Git Bash or WSL to run the Azure Developer CLI commands.
- Important: Ensure you can run
- Azure Functions Core Tools (should be installed automatically with NPM, only install manually if the API fails to start)
- Docker
Then you can get the project code:
Fork the project to create your own copy of this repository.
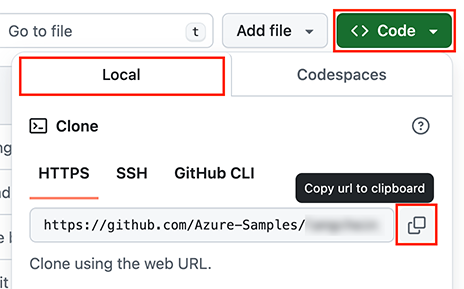
On your forked repository, select the Code button, then the Local tab, and copy the URL of your forked repository.
![Screenshot showing how to copy the repository URL]()
Open a terminal and run this command to clone the repo:
git clone <your-repo-url>
Local development
After setting up your environment, you can run the entire application locally:
# Install dependencies for all services
npm install

# Start all services locally
npm start
This will start:
- Pizza Website: http://localhost:4280
- Registration Website: http://localhost:5173
- Pizza API: http://localhost:7071
- Pizza MCP Server: http://localhost:3000
[!NOTE]When running locally without having deployed the application, the servers will use in-memory storage, so any data will be lost when you stop the servers.After a successful deployment, the servers will use Azure Cosmos DB for persistent storage.
Testing the MCP Server
Using the MCP Inspector
You can test the MCP server using the MCP Inspector:
Install and start MCP Inspector:
npx -y @modelcontextprotocol/inspectorIn your browser, open the MCP Inspector (the URL will be shown in the terminal)
Configure the connection:
- Transport: Streamable HTTP or SSE
- URL:
http://localhost:3000/mcp(for Streamable HTTP) orhttp://localhost:3000/sse(for legacy SSE)
Click Connect and explore the available tools
Using GitHub Copilot
To use the MCP server in local mode with GitHub Copilot, create a local .vscode/mcp.json configuration file in your project root:
{
  "servers": {
    "pizza-mcp": {
      "command": "npm",
      "args": ["run", "-s", "mcp:local"],
      "env": {
        "PIZZA_API_URL": "http://localhost:7071"
      }
    }
  }
}
Make sure that you have the Pizza services running locally by running npm start in the project root.
Then, you can use GitHub Copilot in agent mode to interact with the MCP server. For example, you can ask questions like "What pizzas are available?" or "Place an order for a Margherita pizza" and Copilot will use the MCP server to provide answers or perform actions.
[!TIP]Copilot models can behave differently regarding tools usage, so if you don't see it calling the
pizza-mcptools, you can explicitly mention using the Pizza MCP server by adding#pizza-mcpin your prompt.
Deploy to Azure
Prerequisites
- Azure account: If you're new to Azure, get an Azure account for free to get free Azure credits to get started
- Azure subscription with access enabled for the Azure OpenAI service (if using AI features): You can request access with this form
- Azure account permissions: Your Azure account must have
Microsoft.Authorization/roleAssignments/writepermissions, such as Role Based Access Control Administrator, User Access Administrator, or Owner
Deploy to Azure
- Open a terminal and navigate to the root of the project
- Authenticate with Azure by running
azd auth login - Run
azd upto deploy the application to Azure. This will provision Azure resources and deploy all services- You will be prompted to select a base location for the resources
- The deployment process will take a few minutes
Once deployment is complete, you'll see the URLs of all deployed services in the terminal.
Cost estimation
Pricing varies per region and usage, so it isn't possible to predict exact costs for your usage. However, you can use the Azure pricing calculator with pre-configured estimations to get an idea of the costs: Azure Pricing Calculator.
Clean up resources
To clean up all the Azure resources created by this sample:
azd down --purge
Resources
Here are some resources to learn more about the technologies used in this project:
- Model Context Protocol - More about the MCP protocol
- MCP for Beginners - A beginner-friendly introduction to MCP
- Generative AI with JavaScript - Learn how to build Generative AI applications with JavaScript
- Azure AI Travel Agents with Llamaindex.TS and MCP - Sample for building AI agents using Llamaindex.TS and MCP
- Serverless AI Chat with RAG using LangChain.js - Sample for building a serverless AI chat grounded on your own data with LangChain.js
You can also find more Azure AI samples here.
Troubleshooting
If you encounter issues while running or deploying this sample:
- Dependencies: Ensure all required tools are installed and up to date
- Ports: Make sure required ports (3000, 4280, 5173, 7071, 7071, 8088) are not in use
- Azure Developer CLI: Verify you're authenticated with
azd auth login - Node.js version: Ensure you're using Node.js 22 or higher
For more detailed troubleshooting, check the individual README files in each service directory.
Trademarks
This project may contain trademarks or logos for projects, products, or services. Authorized use of Microsoft trademarks or logos is subject to and must follow Microsoft's Trademark & Brand Guidelines. Use of Microsoft trademarks or logos in modified versions of this project must not cause confusion or imply Microsoft sponsorship. Any use of third-party trademarks or logos are subject to those third-party's policies.


